Showing posts with label Christmas. Show all posts

Thursday, January 1

Organization's Snazzy New Look

One of the perks of my current job is getting a full week off from Christmas to New Year. This year I did spend part of the holiday in Ohio visiting my dad's family, but I still enjoyed several days at home working on projects that have been at a standstill.

My home office is one of those projects. As I've mentioned before, the room basically became a storage area when I moved in. When I adopted Rowena in July and cleaned out the spare room for a new roommate in August the room became a catchall. I shoved everything that I couldn't leave in Rowena's reach in the home office. As you may have guessed the room became a nightmare.

I'm trying again to make the space more usable. One idea I've had is to get creative with the storage so that the room isn't so cluttered. Toward that goal I recently pulled the ugly gray filing cabinet out of the closet and painted it to use as an end table.

Then I took an idea I'd seen on Pinterest and bought a wire shelf at Lowe's. The idea is to install the shelf parallel to a wall to create a narrow space to store wrapping paper. Since all my wrapping paper was precariously balanced on top of the filing cabinet in the closet this seemed like a good time to try out the new idea.

As far as Pinterest projects go I wouldn't label this a fail, but I ran into a few complications. I measured the space before buying a shelf and decided I needed a shelf that was right around three feet. However, the anchors I bought to secure the shelf to the wall didn't allow for the shelf to be shorter than the space.

The wire edge is supposed to hook into the anchor, but since the anchor is flush to the wall and the shelf is maybe 1 1/2 inches shorter than the space I could only hook one side in. Then I also didn't foresee the issue of the space being even wider above the baseboards.

Ooops.

I made it work by using some wire and jerryrigging the anchor to the shelf with the wire. Not pretty, but it is in the closet. For the upper part of the shelf I put one anchor in the middle of the back wall and used the wire again, mainly so the shelf  doesn't get caught on something and pulled off the other two anchors.

The other problem I ran into is that since I was using anchors I needed to drill a hole into my wall first. Since I don't have drill bits for my drill (and my drill never holds a charge long enough for that type of job) I had to put the project on hold until I could borrow my dad's drill. Once I had that securing the anchors was a 10 minute job at most.

In addition to storing the wrapping paper I also used the space to store some mat board and gift bags that I have. It is definitely a handy use for a space that wasn't used much before!

I don't generally set resolutions, but I do like to have some general goals for the year. I think one of my goals for 2015 will be getting more organized and reducing the clutter (something my guest blogger, Amanda Masters, recently wrote about).

Happy New Year everyone!

Saturday, March 1

Wasted Storage Space

I may have mentioned how my kitchen cabinets are so full that I didn't have any extra space for new items. For instance, the Oster standing mixer and food processor from the 60s that I got from Gramma Getchell's house takes up a whole cabinet all on its own. Very frustrating for someone with limited space.

Until I realized I've got a whole area of storage space I'd been wasting.

I was in my laundry room a few days ago when it finally clicked that the cabinets above my washer and dryer don't go all the way to the ceiling like the ones in the kitchen do. There's almost a foot of space up there!

So I moved some of my rarely used items, such as my wok, a serving platter and my cake carrier up there. That opened up almost an entire cabinet!

It isn't necessarily pretty, but it is definitely nice to have. Gramma Getchell's house actually had storage cabinets built in above her kitchen cabinets. You needed a ladder to reach them, but it was nice to have some of the things you only use a couple times a year out of the way. I'll have to remember to have above the cabinet storage installed if I ever build a house.

I also bought a newer fancy gizmo to replace the Oster. Don't get me wrong, the Oster works great and there is definitely something to be said for products that keep working for decades after you buy them (I used the Oster last February to make a King Cake for Mardi Gras), but I really wanted a standing mixer that was small enough to keep on the kitchen counter.

So I bought this:
KitchenAid Standing Mixer

Isn't is beautiful? Lydia and I used it to make gingerbread dough during our baking marathon. I also used it to make cake batter for the New Year's Eve party I went to. I'm looking forward to getting a few of the attachments too, like a food processor.

Fun Fact: My great-grandma has a refrigerator that she and my papaw bought right after World War 2. And it is still running, despite the warranty that ran out in the 50s.

I'll probably try to sell or give away the mixer I got from my gramma's house. While I fully support reusing or re-purposing vintage items, I just don't have the space right now to accommodate a large vintage mixer.

King Cake

Ingredients:
1 (16 oz.) container sour cream
1/3 cup sugar
1/4 cup butter
1 tsp. salt
2 (1/4 oz.) envelopes active dry yeast
1/2 cup warm water (100 to 110 degrees)
1 Tbsp. sugar
2 large eggs, lightly beaten
6 to 6 1/2 cups flour
1/3 cup butter, softened
1/2 cup sugar
1 1/2 tsps. ground cinnamon
Purple, Green and Gold sugar sprinkles
Small figurine or image of Child Jesus OR a large coin

Directions:
  1. Cook first four ingredients in a medium saucepan over low heat, stirring often, until butter melts. Set aside the mixture to cool slightly.
  2. Stir together the yeast, 1/2 cup warm water and 1 Tbsp. sugar in a 1-cup glass measuring cup and let stand for five minutes or until frothy.
  3. Combine the sour cream mixture and the yeast mixture and add the eggs and two cups of flour. Beat at medium speed with a heavy-duty mixture until smooth.
    • The dough quickly becomes thick and heavy like bread dough. My hand mixer couldn't handle it so I used the bread hook on the Oster standing mixer.
  4. Reduce speed to low and gradually add enough of the remaining flour (4 to 4 1/2 cups) to create a soft dough.
  5. Turn dough out onto a lightly floured surface and knead until smooth and elastic (about 10 minutes). Place in a well-greased bowl, turning the dough to grease the top. 
  6. Cover and let the dough rise in a warm (about 85 degrees) place--free from drafts--for one hour or until dough is doubled in size.
  7. Punch down dough and divide in half. Roll out each portion into a 22x12 rectangle.
  8. Spread 1/3 cup softened butter evenly on each rectangle, leaving a one inch border.
  9. Combine the 1/2 cup sugar and the cinnamon and sprinkle evenly over the buttered dough on each rectangle. Then place the Jesus figure or coin on the surface of the dough. 
  10. Roll up each rectangle of dough, jelly-roll fashion, starting on the long side. Place one dough roll, seam side down, on a lightly greased baking sheet. Bring the ends of the roll together to form an oval ring, moistening and pinching edges together to seal. Repeat with second dough roll.
    • I put the two pieces together into one large circle rather than making two smaller cakes.
  11. Cover and let rise in a warm place--free from drafts--for 20 to 30 minutes or until doubled in bulk.
  12. Bake at 375 degrees for 14 to 16 minutes or until golden. Remove from oven and cool slightly on pans or wire racks. Drizzle creamy glaze evenly over warm cake.
  13. Decorate the cake with colored sprinkles alternating colors around the cake.
    • I actually used food coloring to color the glaze and then lightly sprinkled the cake with white sugar. A lot of king cakes are overly sugared (in my opinion) and I didn't want to hunt down purple, green and gold sugar sprinkles.
Glaze:
3 cups powdered sugar
3 Tbsps. butter, melted
2 Tbsps. fresh lemon juice
1/4 tsp. vanilla extract
2 to 4 Tbsp. milk
  1. Stir together first four ingredients. 
  2. Stir in 2 Tbsps. milk, adding additional milk 1 tsp. at a time until glaze reaches spreading consistency.
There is also an optional cream cheese filling that can be used as a substitute to the cinnamon/sugar filling. See directions below:

Cream Cheese Filling:
  1. Prepare each 22x12 dough rectangle as directed. Omit the 1/3 cup softened butter and 1 1/2 tsps. cinnamon.
  2. Increase 1/2 cup sugar to 3/4 cup sugar. Combine with two 8 oz. packages of softened cream cheese. Add one egg and 2 tsps. vanilla extract. Beat at medium speed with an electric mixer until smooth. 
  3. Spread cream cheese mixture evenly on each dough rectangle, leaving a one inch border. 
  4. Proceed with recipe as directed.

Wednesday, December 25

Merry Christmas!

O Christmas tree, O Christmas tree!
This year brought a lot of changes for me personally and my family as a whole. I started my new job and lost two grandparents. In the midst of those changes though I have enjoyed the new direction I'm headed.

One of the perks of my job is that we get nice breaks for the holidays. Over Thanksgiving I was able to drive down the Arkansas to be with my family, it was so different not having my Granddaddy there, but it was still great to see my cousins, uncle, aunts and grandmothers. The day after Thanksgiving my great-grandma made pork chops and other goodies for us (because we were all starved after we had our turkey dinner the day before).

I think my brother Spencer was more jealous of missing the pork chops than he was of missing out on the turkey!

Grandma putting the final
touches on her pork chops.
The weekend after Thanksgiving Tulsa and Northwest Arkansas got hit with several inches of snow and ice.

Snow always puts our area in a tizzy, even if it isn't that much compared to other areas. For example, while we were complaining about our 5" of snow my brother Burns has moved to Montana where they measure snow in feet and the temperature was in the negative double digits.

Regardless, I didn't have to go to work on Friday since the roads around the museum and university were all coated in ice. Instead I stayed home and baked, napped and read. Pretty much the perfect snow day!

Can you find the street?
Notice the bowls full of snow for snow ice cream...

And of course I made snow ice cream...


On Saturday some girls came over for a crafternoon which was great. We all worked on projects that we had. Anything from knitting to quilting or embroidering. Perfect activity for the freezing weather.

Of course, the next round of winter weather was ice. I lost half my maple in the back yard the weekend before Christmas, but at least it didn't take down the power line or damage my fence, deck or house. And I should have firewood to last me forever once we get the wood chopped.

The morning after the ice storm I actually went to Salvation Army to help distribute Christmas presents and food. Despite the fact that we were helping load items in people's cars while it sleeted I was glad I decided to go help. One of my book club friends works for Salvation Army and she asked some of us to come and the weather meant we didn't have as many as we had planned, but those of us who made it got a lot done.

The fallen limb, you can see how
it is almost half the tree.
It was only after I got home that my power was out. Which really put a kink in Lydia and my plans for the afternoon. We intended to have a baking day at my house to get all the Christmas treats that we wanted to make done. Instead we played a game of musical houses. I packed up about five grocery bags full of baking ingredients to haul to my mom's house in Sapulpa.

We were only about halfway done (but luckily finished with everything we had already started making) when the power went out at Mom's house.

So we packed everything up again and went to Dad's house in Jenks. By this point it was nearly 11:00 and we were almost done for the day. We mixed the dough for apricot and prune horns and left it to rise overnight.

Of course, we only thought that was the end of the drama. I woke up Sunday and got started on the apricot and prune filling and rolling out the dough only to discover that Dad's oven had inexplicably stopped working. Which meant that we had no way to bake the horns. Luckily my power had been turned back on sometime the previous evening (which I was extremely grateful for since I didn't want to have to transfer the contents of my refrigerator again) so we packed everything up AGAIN and went back to my house.

Ridiculous.
Close up of the fallen limb.
Apparently the limb is mostly hollow,
a squirrel lost it's home.
We managed to get almost everything made and left Monday for my grandmother's house in southern Arkansas. I'm pretty sure we wouldn't be allowed to stay for Christmas if we didn't get the buckeyes made for my cousins and brothers.


Gramma Getchell's Buckeyes
          2 cups peanut butter
1 box powdered sugar
3 cups Rice Krispies
1/2 stick Butter, melted
2-3 pkg. chocolate chips or baking chocolate
paraffin wax
  1. Mix peanut butter, powdered sugar, butter and sugar in large bowl until well blended.
  2. Shape mixture into walnut-sized balls. Makes about 60 balls. 
  3. Melt chocolate and paraffin wax in double boiler. Using skewer dip balls in chocolate until coated and place on wax paper to set. Refrigerate until chocolate hardens. 

Sunday, January 20

Homemade Christmas

This year I went all out on the homemade Christmas gifts. I bought quite and few things too (and shopping for great deals online is a lot of fun), but I'm really excited about the things that I've made.

The Men

For the men in my family I made hand warmers. All of them like to go hunting, and I figured it might be nice to have these reusable hand warmers that they can pop in their pockets. They were really easy to make, just sew little squares of polar fleece together and fill with rice. Then you heat them in the microwave for under a minute and they stay warm for up to an hour.

I found a gray fleece on sale at Hobby Lobby that had red, white and black dots. I figured that was enough of a pattern to not look boring, but not so overdone that it wasn't masculine.

The Women

All the women all got homemade vanilla extract. The recipe is really easy, you just need rum, vodka or everclear that is at least 35% proof.  I used everclear since that is what a friend uses for hers. Then you take a whole vanilla bean, slice it down the length of the bean and toss it into a sterilized jar. I used old jars I had saved, like from jelly or salsa. I just boiled them for about five minutes before using for the extract. Pour your liquor over the bean, screw the lid on tight and shake. Then put the jar in a cool, dark place (like a cabinet) for two months and "agitate" weekly.

I think the rule is roughly one bean per one cup of liquor. Once the extract is ready you just top off the jar as you use the extract and add a new bean when the old one dissolves.

Once the extract was ready I printed out labels (I just used colored paper and glued them on), painted the lids with metal paint (already on hand from another project) and tied ribbon around the top. I think they turned out really cute. My main concern was wrapping them, so I sealed each jar in a ziploc baggie, then put a lot of packaging material around them in the box. Then I marked which way was "up" on both the box and the wrapping paper.

Dear Old Dad

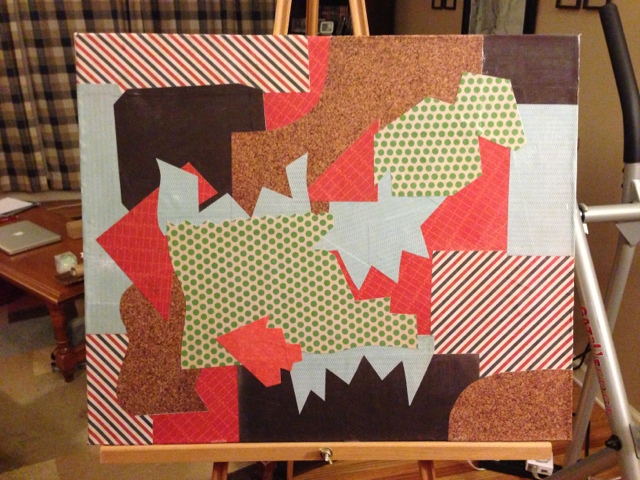
My dad's gift is a little more time consuming. His walls are so bare and he had mentioned that he liked the art pieces with a bible verse integrated into the art. So, I attempted something new that I found on pinterest. I went and got a canvas and scrapbook paper and covered the canvas in a collage of paper.

For this project I dragged my friend Grace Grothaus along for advice on what materials to buy. She suggested using Liquitex Gloss Medium and Varnish to glue the paper down. I put a layer of the varnish on the canvas, stuck on the paper and then painted more varnish over the top. One thing to keep in mind during this step is to wrap the paper all the way around the canvas before the varnish dries since afterward the paper will be less malleable. 

So here's what step one looked like:


Personally if this is what you were going to see with the end product, it would never make it onto a wall. While there are parts I like, the overall effect is too scattered and chaotic. If I were to start over I would probably stick to squares of color or cut each piece much smaller instead of the wild shapes I used. It also occurred to me after the fact that I could have used fabric instead of buying a book of scrapbook paper for $20. I have plenty of scrap fabric.

Step two required me to track down sticky letters to spell out the verse. Grace suggested ordering the verse from Lithaprint, but when I tried contacting them I didn't have any luck getting in touch with a person. Instead I just bought the letters you would stick to your mailbox. You just stick the letters to the collage and then you're ready for step three!

Step three is what makes the piece come together. While I did stick to a color scheme for the collage (bold colors, mostly reds and blues) the third step is to paint over the whole canvas. I chose a gold for this part.


Once the paint is dry you go back and pull off the sticky letters and end up with the collage visible where the letters were. So it looks something like this:


I was frustrated some of the paper pulled away when I removed the letters. Another reason fabric would be a better medium, it wouldn't tear like the scrapbook paper did.

After I repaired some of the damage I coated the entire canvas in a clear coat and voila!

What do you think?


Monday, December 31

Winter Wonderland


We experienced a white Christmas in southern Arkansas for the first time that I can recall. My grandparents live on about 60 acres near Hope and on Christmas Day we looked out to see snow coming down--a big change from the years that we've worn shorts and t-shirts to play outside on Christmas. Luckily the roads were clear for the drive home the next day. Snow is a beautiful treat when you have no where that you need to go.

My cousins ran outside for a photo shoot as soon as they realized that it was snowing. My mom and I waited until the ground was white.


Ollie came to Arkansas for the first time this year. As a result he got to experience snow for the second time. I don't think he's any more fond of it now than he was during the blizzard Tulsa got a couple years ago. At least it wasn't as deep this time.

Ollie wasn't sure what to make of the snow.

Christmas Spirit

I spent the month of December before Christmas in a decorating and baking flurry. I bought a rosemary tree at Reasor's and wrapped red ribbon around it for my table centerpiece. And a big red pot to plant it in.


I modified an idea from pinterest where you take a pretty cake plate and use garland and glass ball ornaments to create holiday decor. On pinterest they used a tiered serving tray.


I made "crack", a recipe from my gramma that is so addictive. It involves lots of butter, saltine crackers and chocolate.

I also made sugar cookies with crushed peppermint in them, cherry coconut candies, buckeyes and apricot horns. I also made a few prune horns since my dad prefers those for some reason.

Most of my recipes turned out in the end, but I had a few challenges throughout the process--mainly with the horns and the cherry coconut candy. I won't get into the details, but by the time I finished those candies I didn't even want to try one. I froze a few in case I finally decide I want some by spring.

Everything was a big hit with my family though. If the buckeye recipe didn't make so many my brothers and cousins might have come to blows, luckily we didn't run out!

I set up my nativity scene, which I still love. Jim Shore makes some of the most adorable pieces, I only wish I had the full size nativity instead of the miniature since so many of the pieces on his site are too big for my set.

I put up my tree! I also culled my ornaments and gave away those that I didn't actually care for--although I opted for just lights and the star to decorate this year. I really like the plain white lights and I just bought the star for the top so I've enjoyed showcasing it.

When I first got my tree a few years ago I didn't have any ornaments. My mom and grandmother both gave me some of the ones they didn't use anymore. However, I've collected more over the past few years. I'm going to try to build my collection with pieces that mesh well moving forward.

I had a lot of fun shopping for everyone this year. I got some great gifts, mostly things I needed for around the house. One of my cousin Macy's favorite gifts was her American Girl doll. It made me wish I had brought one of my dolls and the clothes I've got stored in my attic so we could have played with them. 

A Few Miscellaneous Pictures

I'll end this post with a few random pictures that I took over the holidays this year.

My mom's neighborhood has a flock of wild turkeys.
They made me wait while they crossed the road.
My gift for Macy. A lady at one of the
courthouses I go to makes and sells them.
Ollie finally calmed down on the drive home,
the whole way to Arkansas he kept
jumping around the car every few minutes.
These lights make me wish I had a central walk
so I could do something similar.

Monday, December 13

'Tis the Season!

Okay, so I've been promising for a while now to show off what I've done to decorate this year. Since I'm finally done here's the post!

Story Behind the Tree
Last year a friend, Grace Grothaus (awesome local artist, check out her stuff here) finished a show that included several full-size Christmas trees. Since she didn't need 7+ trees after her show she gave me one! I collected ornaments from my mom and grandmother and bought a few on sale after Christmas last year. Now I almost have too many ornaments!

In the background of this pic you can see Ollie's stocking (mine is still with mom's decorations and gets hung on the mantel at home). You can't tell, but I use the first quilt I made as a tree skirt because the colors and size are perfect.

You also may notice my tree lacks a topper. I really want to get an angel to go on top, but not one of the cheap ones that falls apart before you even get it home. I also don't want to spend a small fortune on it though. At work we have one of those crocheted angels, I think that would be awesome. So apparently I need to learn to crochet. And find time for it. Or maybe one of you can already crochet and is just dying to make me an angel?

Handed Down
Here are a few of the ornaments that I got from my mom and grandmother:


Yes that is a Santa made out of okra! And that little wooden wagon has been around as long as I can remember (there's a matching wheelbarrow as well). My great-grandma actually gave me the little tree with button ornaments. Love these!

Then I have these ornaments from Korea that I got from work. We had dozens of these so I got to bring some home for my tree last year. They come in all sorts of colors and are just adorable!

Enough About the Tree
Growing up the nativity scene was one of the things my siblings and I had the most fun setting up. We would argue over where to put baby Jesus or the wisemen. Mom's stable even had little mangers that we sometimes put real straw in.

I found my nativity on sale at a little shop in Sand Springs a few years ago. I loved how unique the design was and that the pieces were wood (and therefore not quite as fragile). My set was designed by Jim Shore, who I had never heard of before I found this nativity set.


Since then I bought a few other pieces (such as the palm tree and camel). I simply love his stuff! Each piece of the set has a different design. For example: the shepherd has the scene of the angels coming to the fields to share the great news; one of the wisemen shows the star over Bethlehem and Joseph shows the trip to Bethlehem with a very pregnant Mary. 

This and That
This rocking horse was a gift that I received several years ago. In high school I would put it in my room with my miniature tree and electric candles for the windows. Something about candles and fire just makes it feel more like Christmas.

In the bar area I used the table runner my friend Claire made me as a housewarming gift. You can't tell in this picture, but that fabric has these adorable little snow-covered trees printed on it. Claire also made me matching place mats and some napkins.

The glasses are from Pier One. Since I had the candy leftover from Halloween I put a little red tissue paper in the glasses and divided the candy between them. So far I haven't been too tempted by the candy sitting out. I keep hoping other people will eat it!

I found the awesome pitcher (seen below on the dining room table) and margarita glasses on clearance. There were several styles of glasses, but I felt these would be the most useful. I scored both glasses and the pitcher for under $20.

My table centerpiece was inspired if I do say so myself. I found a package of those red and gold glass balls at Lowe's for a good price. Then I already had the gold beads and decorative wire. I kept the table runner that the St. Mary's youth made (also featured in this post). Very simple, but classy.


Oliver
Last, I will leave you with this picture of Oliver, all decked out for the winter weather. Now, let me just say that in the past I have been somewhat opposed to dressing up your pet, but Ollie gets so cold in the winter that it just seems cruel not to put a sweater on him. Besides, doesn't it look cute?

Friday, November 26

Baby, It's Cold Outside...

I hope everyone had an awesome Thanksgiving! This year my dad and I celebrated here in town with a wonderful meal (Dad claims our turkey was the best he's ever made, it was pretty delicious) topped off with an apple pie.

We started a pot of turkey soup with some of the leftovers (you can see it simmering in the crock pot behind my beautiful pie). I loved the opportunity to use my kitchen and my "fancy" dishes.

I have a list of projects that I plan to get done this weekend. Dad and I got the Christmas tree set up last night, I'll post pics once it's decorated and the other decorations are out. I'm excited to show off my ideas! Meanwhile, I broke down and bought something new for the house...

My new electric fireplace.
If you follow my facebook page you probably saw me asking a couple weeks back for advice on whether an electric fireplace is worth the money. My living room is the largest room in my house and I typically have a hard time heating it. This fireplace can supposedly help heat a 400 sq. foot room, or you can turn the heat off and just enjoy the flames. Lowe's had it on sale so I broke down and bought it today. So far I'm really enjoying it. It does seem to heat the space some. Plus now that it's dark out I can enjoy the flames! This particular model also came with a storage cabinet in the mantel.

No pictures today, but I also bought the pendant lights for the kitchen bar area (see more about this project).

Last thought: Did you know that you can recycle your old Christmas lights at Lowe's? They have a bin by returns and customer service that you can just toss those old strings that don't work in. I thought I read that they would give you a $4 off new LED Christmas lights if you recycle old ones, but the store employee didn't offer me any coupons today when I took mine in. Still, it's a better option than throwing them away.

Has anyone else started on their Christmas cards?
Related Posts Plugin for WordPress, Blogger...