Showing posts with label projects. Show all posts

Thursday, January 1

Organization's Snazzy New Look

One of the perks of my current job is getting a full week off from Christmas to New Year. This year I did spend part of the holiday in Ohio visiting my dad's family, but I still enjoyed several days at home working on projects that have been at a standstill.

My home office is one of those projects. As I've mentioned before, the room basically became a storage area when I moved in. When I adopted Rowena in July and cleaned out the spare room for a new roommate in August the room became a catchall. I shoved everything that I couldn't leave in Rowena's reach in the home office. As you may have guessed the room became a nightmare.

I'm trying again to make the space more usable. One idea I've had is to get creative with the storage so that the room isn't so cluttered. Toward that goal I recently pulled the ugly gray filing cabinet out of the closet and painted it to use as an end table.

Then I took an idea I'd seen on Pinterest and bought a wire shelf at Lowe's. The idea is to install the shelf parallel to a wall to create a narrow space to store wrapping paper. Since all my wrapping paper was precariously balanced on top of the filing cabinet in the closet this seemed like a good time to try out the new idea.

As far as Pinterest projects go I wouldn't label this a fail, but I ran into a few complications. I measured the space before buying a shelf and decided I needed a shelf that was right around three feet. However, the anchors I bought to secure the shelf to the wall didn't allow for the shelf to be shorter than the space.

The wire edge is supposed to hook into the anchor, but since the anchor is flush to the wall and the shelf is maybe 1 1/2 inches shorter than the space I could only hook one side in. Then I also didn't foresee the issue of the space being even wider above the baseboards.

Ooops.

I made it work by using some wire and jerryrigging the anchor to the shelf with the wire. Not pretty, but it is in the closet. For the upper part of the shelf I put one anchor in the middle of the back wall and used the wire again, mainly so the shelf  doesn't get caught on something and pulled off the other two anchors.

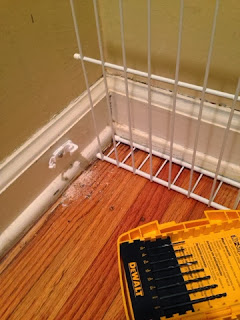
The other problem I ran into is that since I was using anchors I needed to drill a hole into my wall first. Since I don't have drill bits for my drill (and my drill never holds a charge long enough for that type of job) I had to put the project on hold until I could borrow my dad's drill. Once I had that securing the anchors was a 10 minute job at most.

In addition to storing the wrapping paper I also used the space to store some mat board and gift bags that I have. It is definitely a handy use for a space that wasn't used much before!

I don't generally set resolutions, but I do like to have some general goals for the year. I think one of my goals for 2015 will be getting more organized and reducing the clutter (something my guest blogger, Amanda Masters, recently wrote about).

Happy New Year everyone!

Wednesday, November 21

Let There Be Light!

My pendant lights are installed!
Finally! On Monday I was able to get an electrician to come out and install the lights that I posted about a while ago. I originally started thinking about this project in 2010. I even had an electrician give me a price quote before I had a financial set back and ended up putting the project on hold.

In the process...
I already had the light fixtures, but since there weren't already lights over my bar area I had to have an electrician install the wiring. What surprised me was how hard it was to pin down an electrician! With all the complaints about the economy I thought finding someone to do a job right before the holidays would be pretty easy. However, I wanted to use someone that was recommended so I wouldn't worry about safety or the quality of the work.

I called the company that gave me a price quote back in 2010, but after talking to the receptionist twice and never getting a call back I moved on.

The second electrician I spoke to sounded interested, then I never heard back from him. Even after calling and leaving another voicemail. I finally found an electrician who was able to come out Monday morning (which was perfect since I already had the day off).

They drilled holes from the attic for the wiring and made a second double switch where the light switch for my kitchen is.

The guys were really careful to make as little mess as they could and by the time they left I think my kitchen was cleaner than when they arrived!
Something that I hadn't considered until my electrician, Jason Camp, asked was buying light bulbs for the new fixtures. Luckily he had some that fit. He said that it happens all the time; he'll finish installing 100 light fixtures and there won't be a single bulb for any of them. Light bulbs were especially important because he needed to test that the wiring was connected correctly. And as it turned out one of the wires on the middle light actually came loose so the light didn't work when he checked it. He had to take the housing off again and reconnect the wire.

See how the one on the end looks orange?
Interestingly, the light on the end closest to the wall turns orange once the lights are on. When the lights are off all the shades appear the same color of red. I'm not sure what causes the different color, but I'm debating moving it to the middle so it doesn't look as awkward.

Do you think it looks strange?

I'm so excited to finally get this project checked off my list. Not only do I now have beautiful lighting over my bar (an area that didn't get much light), but the cabinet where I was storing the glass pendant lights and light kits is now freed up for other storage!

I went ahead and rearranged the cabinets and cleaned up my laundry room Sunday evening after taking everything out for the electrician. I was amazed by how much space I had. The lights take up a lot less room hanging over the bar then they did in storage.

What do you think? Doesn't the pop of color add to the space?

Monday, August 15

A Turquoise Lamp

I've been noticing turquoise lamps in a lot of the home magazines lately. They are generally the perfect accent piece for the room. And seeing how perfect they look made me want one--just not enough to shell out $50 (or more) to get one.

Before
So I started thinking about the lamp in my office. It's a great lamp, but the color/design doesn't necessarily mesh with the rest of the room (or my plan for the rest of the room I guess).

I decided this lamp was meant to be turquoise.

At first I thought the best way to paint this lamp would be to get a high-shine spray paint in turquoise, but I quickly discovered that there are no turquoise spray paints on the market. I checked Walmart, Lowe's and Home Depot without success. I decided to get a can of paint instead.

Share Your Thoughts: 
Don't you agree that turquoise will just make that corner pop? Have you all seen the lamps I'm referring to?

After two coats of paint the lamp was starting to look just how I pictured, but the old lampshade (which worked great with the sandstone color) was completely wrong for the updated look. So I made a trip to Target to look at lampshades. (I love Target's lampshades! And Target in general.)

I was looking for a white or linen colored shade in a "drum" shape. I think what I found is perfect. Check it out:
After (lamp on)

Here's what it looks like when it isn't on:
After (lamp off)
The camera doesn't capture the exact shade of blue that I painted the lamp, but you get the best idea in the picture where the lamp is one. That strip at the top where the lamplight is shining is pretty close. Overall, I'm thrilled with the project.

The lampshade is white and has a ripple design that gives it texture. It makes it fun to look at whether the light is on or off. I bought just a pint of paint, but this project barely made a dent in the can. Any ideas of what else I should paint turquoise?

Sunday, June 5

Installing a Peep Hole

One of the selling points of my house was the front door. It's gorgeous.  Solid wood with a beautiful design. There were only two problems with it.
  1. The design allows for some hairline cracks that let my heat and A/C escape and the outdoor weather in.
  2. There was no window or peep hole.
Both are pretty easy fixes, but the peep hole was a priority for me. Not having a window is actually pretty practical for a front door, but it was important for me to be able to check who was at the door before I open it.

A couple weeks after I moved in my dad brought his drill over and we bought a peephole at Lowe's. Less than an hour later I was able to peer through my front door to see who's at the door.

I'm actually glad we installed this because I was able to place the peephole at a level that is easy for me to see out of. And this project is one I could probably have done myself (with the help of my dad's tool kit anyway). We took his drill and (making sure the bit was the right size) put a hole through the door. The most important part is making sure the hole is completely straight. Once you have the hole you just put the peephole pieces through each side and screw them together firmly.

Monday, January 3

My Garage

You can see part of the garage on the left.
Does anyone understand the purpose of a garage door that doesn't open automatically? Is anyone really going to take the time to park, open the garage door, pull in and shut the garage door? Or the reverse of that just to go anywhere? And what if it's raining? You might as well park in the drive and make a dash for it, you'd probably stay drier.

One of the selling points of my house was the spacious one-car garage. It didn't have an automatic door opener, but the previous owner agreed to pay half the cost for installation when I requested it. I've loved it. Extra security when I get home late, no chipping ice off the windshield in the winter, a lighted area to work on things like replacing headlights or adding oil.

The downside to my garage is that the door is so blasted heavy it takes two MEN to open it if the opener craps out (there is no way I can lift it myself). The only times I've had trouble with this is when the power was out to the house, so it isn't usually an issue with the garage door opener. I've always been concerned about the door though because whenever I open or close it the automatic opener sounds like it is barely able to complete the job.

On New Year's Day I discovered that the garage door wouldn't open more than halfway. I was on my way out to catch a movie with some friends, but after trying to open and close the garage unsuccessfully I shut it manually. At that point it was pretty clear I'd be staying in for the night.

As I usually do when something goes wrong and I'm not sure why, I called my dad. He came out to look at it Sunday and said he thought the door was binding and the spring that acts as a counterweight was broken. Neither of those issues are something my dad can fix, which meant calling a professional.

About the Door:
  • The door is an uninsulated metal door, according the the repairman who came out from Overhead Door of Tulsa it's one of the cheapest on the market. 
  • The previous owner added a decorative wood facing to the door. As you can see in the picture above it does look nice. However, the metal door is rusting and wasn't designed to bear the weight of a wood facing.
  • The facing added a ton of weight to the door and the previous owner didn't compensate for that. The repairman said that the spring should have been replaced with a sturdier one meant for more weight. 
  • The hinges and tracks were also designed for the lighter metal door, the additional weight will likely cause it to give out sooner.

What To Do
The repairman's advice was that I invest in a new garage door. Dad thinks I can probably hold out for about a year--especially if I clean and paint the door with a rust inhibiting paint. The long and short of this is that my pendant lights may have to wait a little longer.

The repairman did fix my garage. He told me to keep an eye on the bolts, etc. since I'll probably need to tighten them periodically. He also adjusted some of the parts that weren't installed properly and replaced the spring with a bigger one, I should be able to open the door myself now!

Share Your Thoughts
Anyway, with that exciting start to the new year, do any of you have advice about garage doors? Experience with types or brands that are worth buying (or not)?

Wednesday, December 8

A Perfect Accent

I mentioned in a previous post that I bought the lights for my bar area. Beautiful red glass globes, they will set off my kitchen perfectly! At that time, however, I was still looking for an electrician. Last week I got a couple of recommendations and took the first step to getting this project finished--I called them.

Out of the three electricians I called only one returned my call and we met at my house on Monday for him to see the area and give me a price quote. The company I've decided to use is Elite Electric in Broken Arrow. I chose them partly because they were recommended by a friend, but mostly because I work on the theory that a company that doesn't have my business yet, but doesn't even bother to return my call is probably a company I don't want to do business with anyway. Elite Electric called me back the same day I called them.

Here's what I learned when I met with Terry from Elite Electric: 
  • My rafters run from east to west. This might cause some complications when they are spacing the pendant lights, but Terry promised they'll make sure the lights are evenly spaced.
  • I need to buy the entire light fixture ahead of time (right now I just have the glass globes) so they know whether the lights will be high or low "impact." I gather that this will make a difference as to the type of power box they install for the lights to connect with.
  • It will be easier to put the light switch next to the switches already installed. Mainly because the other wall near the bar is an exterior wall and has more insulation.
  • This project should only take an electrician about three hours. Elite Electric charges $70/hr. I was considering having them just set up the wiring and then Dad and I installing the lights. That would save me approximately $35, which I don't think is worth the hassle.
  • The electrician can come over before I leave for work and I don't need to stay. That might be because my brother will probably still be here though. It will be awesome if I don't need to take the day off work to get this done though.
I was very impressed overall. Terry arrived early, before I even made it home from lunch. He said he could have someone out by next week, but I plan to wait until after the holidays. I don't want to mess with having a big project in my kitchen/living space while all my decorations are up and my schedule is so hectic.

Speaking of decorations, I know I've promised pictures. Unfortunately I'm still not finished getting everything set up. Everything is looking awesome though!

Friday, September 24

Building a Pond: an alternative to gardening


The finished project.
Trying to keep a garden alive in the 105 degree summer heat is nearly impossible, especially when neither you nor your husband have a green thumb.


After a few months of coming home and seeing our pathetic weeds, we decided to do something to make our home have more ‘curbside appeal.’ That is when Ryan decided to build a pond. I was excited and all for it...until about a third of the way through building it when I realized just how much manual labor this was really going to be.


We started by digging our raised garden BY HAND. We fought through the roots and weeds that wanted to get in our way. There were over 25 wheel barrows full of dirt. It was insane! If we were to do it again, we definitely would have rented a mini back-hoe from Home Depot ($50 dollars a day).


After getting everything dug up, Ryan installed valve boxes to house the pumps. I am glad I married a handyman, I would not have known what to do. We had to buy the pump and filter, but we were able to make the bottom drains and water fall weir (by we, I mean Ryan).


Finally, it was time to put down the liner and start building our pond. Coming up with ideas on paper was the easy part, actually putting in the waterfall was not as easy as it seemed. We thought of plenty of ideas, but they all had at least one thing that would be trouble shooting. Our pond stayed green for about a month. We would go outside a couple of hours every day or two, but Texas was having the 110 degree weather spells, and it was just too hot. Our house was seriously the messiest one on the block, but we just couldn’t figure out what to do!


One weekend, Ryan and I went outside, and spent 10 hours each day and finally figured out what to do.


We went to buy some flat flagstone rocks, and we arranged them over 30 times, until we found the perfect way to do it! After setting it all up, we decorated it, but we just didn’t like it. The water wasn’t running well, and it just did not meet our expectations. All of the water was seeping into the cracks, only about a fourth was actually making it to the bottom of the fall.


After doing further research, we took everything down, and put in mortar to hold the rocks together.


After two days, when everything was dry, we put it together again, and we could not have been any
happier! It ran beautifully, and has such a wonderful, relaxing noise. Every night, my hubby and I go out there to relax and spend time together.


If you want to add a pond to your yard, our advice to you is:
  1. Before you start, know how much it’s going to cost you. Rock is anywhere from $.20/lb to $.50/lb, and you will need a lot of it. This is one place that Ryan and I failed. We did not budget more than $100 for rock, because who would think rock would be expensive?! Also, just the liner, pumps and filter depending on the size of your pond can be $300 to $1200.
  2. Make sure you have time set aside. Ours took us a month to do, and that is going outside everyday for a few hours.
  3. Have a truck to carry rocks in. 
  4. Be ready to spend every night outside listening to the peaceful sound of water flowing.
  5. Last but not least, be ready for a lot of visitors and compliments.


Ryan and Emily Fiscus
Two years ago, Ryan and I went out on our first disastrous, yet unforgettable, first date. Rather than us parting ways, we gave it another shot and are now newlyweds (just shy of being married six months). We keep falling more in love every day.  

We have beautiful home just south of the DFW metroplex and two very hyper three month old puppies that keep our lives interesting. We both stay busy during the week. Ryan is an HVAC technician working on owning the family business and I work as a school photographer, yet we still find time to update and ‘beautify’ our house. So far, we have done paint jobs, built fish tanks, made furniture and last but not least, built our beautiful pond.   

Life couldn’t be any better!

Saturday, June 19

Dreaming

One of my favorite parts of owning a home is that I can follow through with all the decorations, projects and ideas I have. For example, my backyard is getting a major overhaul this summer. Dad and I are building a deck (with the help of my brothers). I'm adding a small retreat with a hammock and bird bath, building a flowerbed and adding stepping stones to the side yard.

I'm a creative person, I think that's why I found renting such a frustrating experience. When I look around my surrounding I picture the way I want things to look; the changes I want to make, furniture or decor I should add, etc. With a rental property you're limited by what your landlord approves.

But the best thing about dreams is that once you've brought one to life there are plenty more to come up with. Here are a few projects I won't get to this summer, but I am so excited to see the finished result someday!
  • Once my deck is finished I really want to screen in the porch area. While I love my porch and the new deck, mosquitoes and I have a love/hate relationship (they adore me, I loathe them) so I often limit my time outdoors. If I screen in the porch I can open up my french doors without letting critters into the house and maybe even put a table outside so I can enjoy my meals out there without losing any blood. Another great addition to the porch would be a ceiling fan for the warmer months.
  • The original washer/dryer hook-ups at my house were in the garage. A laundry room has since been built, but the plumbing for the old washer hook-up is still there. I really want to add a utility sink out there; great for jobs like washing the dog, soaking clothes or rinsing off muddy shoes!
  • My big dream: a second bathroom. I love my house, but I think a second bathroom would be a great investment on many levels. The laundry room is enormous and could easily be divided into a small bathroom and laundry area. I love to go through the bathroom supplies area at Lowe's or Home Depot and look and sinks and showers to find ones I like. Unfortunately, this project will probably cost close to $10,000. It will probably be a few years before I can afford it and even then I'll need a second loan to cover the cost. :(
 What are some of your big (or small) dreams? Any of those dreams brought to completion?
Related Posts Plugin for WordPress, Blogger...